When it comes to my craft, a question I’m often asked is: “how do I get started with hand embroidery?”
While I could come up with an exhaustive list of all you could possibly invest in, I believe that overcomplicates things and can be a roadblock to stitching. There really are only a handful of supplies you need to begin embroidering, which is one of the many reasons I enjoy the craft so much! It doesn’t require a lot of monetary investment to get started, and you can always add to your toolbox if you decide it’s something you enjoy.
So what do you need to get started with hand embroidery? I’m glad you asked!
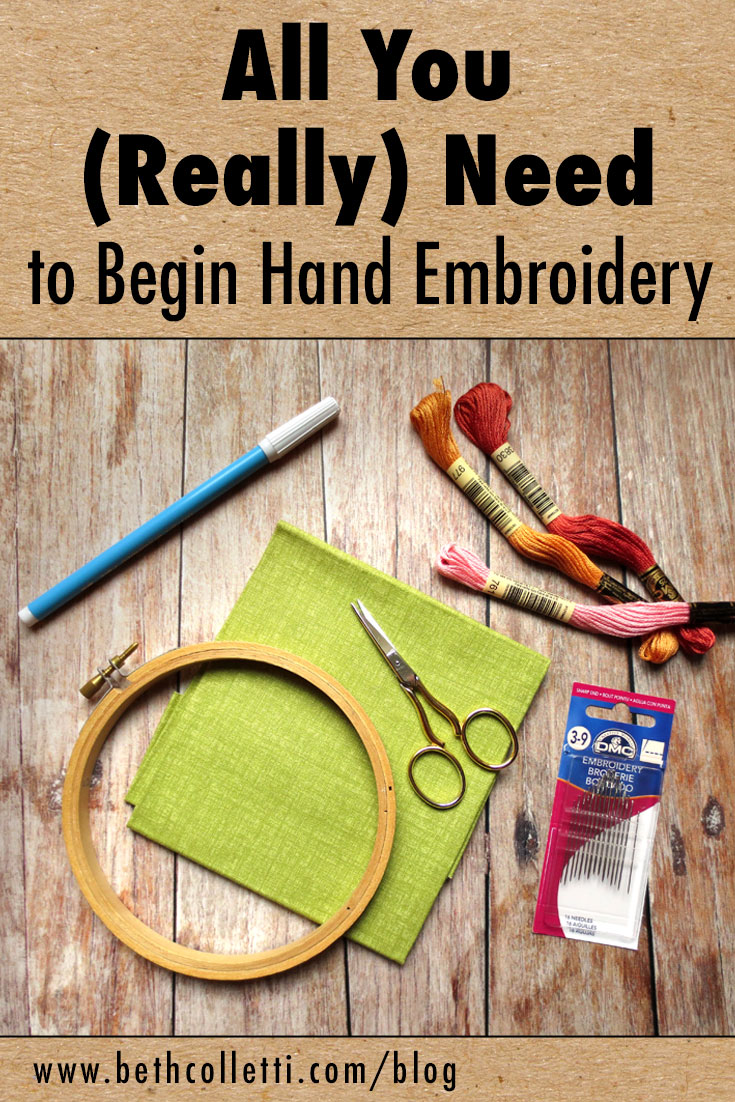
1. Fabric
If you’re brand new to embroidery, I’d suggest stitching on 100% cotton to start. If you’re not sure where to pick fabric up, try grabbing a quilting cotton fat quarter at a place like Walmart, or check the remnant bin at your local Joann store. Choose a piece that is a good four inches or larger than the pattern or design you want to stitch. For more information on fabrics that you can stitch, you can check out this article on great fabrics to use for hand embroidery.
2. Embroidery Hoop
Most craft stores sell a variety of embroidery hoops in different sizes. I’d recommend a simple wooden embroidery hoop if it’s your first time stitching, though there are several plastic types available as well. Embroidery hoops are not only effective for keeping your fabric taut as you stitch, but can be decorated to display your finished embroidery art too.
3. Thread
There are a lot of different threads you can try using for embroidery, but to get a feel for the craft, give 100% cotton six-strand embroidery floss a try. Six-strand floss can be used together (all 6 strands) or separated into individual strands. How thick your stitches are will depend on how many strands you divide your floss into. Brands like DMC or Anchor are generally widely available in craft stores, depending on where you live. Once you learn some basic stitches, you can try using perle cotton, tapestry wool, and many other threads to experiment with texture and appearance.
4. Embroidery Needle(s)
Different threads require different needles, so if you’re going to try stitching with six-strand embroidery floss, I’d recommend picking up an assortment of embroidery needles. DMC offers multi-packs in craft stores that give you a range of sizes. Needles with smaller eyes are suitable for fewer strands while larger eyes are suitable for more strands, or thicker thread.
5. A Way to Transfer Your Pattern
Once you have your fabric, embroidery hoop, thread and needles, you are almost ready to start stitching! But first you have to transfer your pattern. Water erasable fabric transfer pens are fantastic for lighter or medium colored fabrics. You can draw your own design, or print out a pattern, put your fabric over it, and trace the pattern with your pen. After you stitch over the pen marks, rinse it out with cool water. Transfer pens from several manufacturers are available at craft stores and places like Amazon.com.
Don’t want to purchase a transfer pen? You can try using a pencil, but be aware that you have to stitch very neatly over your marks because they won’t wash out.
6 - A (Small) Pair of Scissors
While I like to specifically use embroidery scissors when I stitch because they are small and slender for snipping close to my thread ends, you can use regular scissors if they aren’t too big. A large pair of scissors will make it challenging to clip your threads neatly when you finish stitching.
That’s it!
If you are ready to get started and practice some stitches, I’d invite you to join my newsletter community where I share a free downloadable pattern that will give you the chance to learn a variety of basic embroidery stitches.
Enjoy this free stitch sampler pattern when you join my newsletter community.
Additional Supplies
If you try hand embroidery and decide you enjoy it, there are many other tools and supplies you can invest in to expand your knowledge and streamline your stitching. That being said, the items listed below are purely optional! Feel free to use this list as a reference for future projects if you so desire.
Threader
Although not totally necessary, I do so love using my threader when threading my needles. It helps me work faster and saves my eyes when I’m squinting to get floss through the needle’s eye.
Thread Organizer
Right now I have one of almost every color of DMC six-strand floss, plus a variety of perle cotton, sashiko cotton, crewel wool and lots of other fun threads! Organizing my growing supply stash is a must so I have several thread organizers that I picked up at a craft store. The bottom line: do what works best for you!
Photo credit: Access Commodities
Sit-on Embroidery Frame
When you do a lot of stitching on a regular basis, you may find holding the hoop to be a bit of a nuisance as you work. A sit-on embroidery frame not only holds the hoop for you, thereby freeing up one of your hands, but it can also be raised up so that you aren’t bending your neck over your work as much.
Snap Frame
A snap frame is simple a square or rectangular frame that you can snap your fabric into for stitching. While I use embroidery hoops for most stitching, I’ve used a snap frame with fabrics such as felt, or heavy duck cloth.
Photo Credit: Artograph
Lightbox
A lightbox is a bit of an investment, but I like to use one for transferring patterns when my fabric is a bit heavier or darker in color. Otherwise you can tape your printed pattern to a bright window and trace it using sunlight as your backlight.
Printable Dissolvable Stabilizer Paper
Printable dissolvable stabilizer paper is another great item to have in the toolbox when you want to transfer a pattern that is particularly complex or when you’re stitching on very dark or heavy fabric (like denim). The paper has an adhesive back and sticks to your fabric and you stitch through it. Afterwards the paper will rinse out in cold water.
Needle Minder
There’s nothing worse than losing your needle when you’re stitching! A needle minder is essentially a magnet that you attach to your fabric. Let your needle rest there when you aren’t using it.
Stitching Books
I do love collecting current and vintage embroidery books, but purchasing an encyclopedia of stitches isn’t totally necessary unless you want a printed reference. Nowadays there are plenty of embroidery video tutorials online which often illustrate embroidery techniques far better than a drawing. If you do want some embroidery books, check out book sales at your library or used books on Amazon.com.
Have you discovered an embroidery tool that you’ve found particularly useful? Share it in the comments below!
(I am an Amazon Associate and from time to time will use affiliate links for products that I love, or that I think you will find useful.)


